To setup your general configuration in MGL:
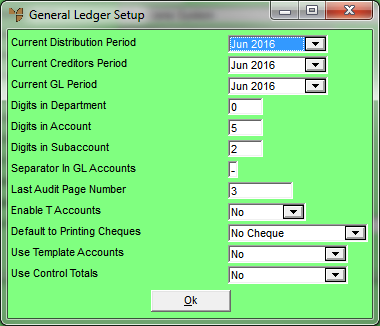
Micronet displays the General Ledger Setup screen.
|
|
Field |
Value |
|
|
Current Distribution Period |
Micronet displays the period MDS is set to. This is updated each time End of Month is run in MDS. |
|
|
Current Creditors Period |
Micronet displays the period MCL is set to. This is updated each time End of Month is run in MCL. |
|
|
Current GL Period |
Micronet displays the period MGL is set to. This is updated each time End of Month is run in MGL. |
|
|
|
Warning Never manually change the period for MDS, MCL or MGL. |
|
|
Digits in Department |
Enter the number of digits for the Department segment in account numbers. |
|
|
Digits in Account |
Enter the number of digits for the Account segment in account numbers. |
|
Digits in Subaccount |
Enter the number of digits for the Sub Account segment in account numbers. |
|
|
Separator in GL Accounts |
Set to “-” (dash) if using Departments or sub-accounts. |
|
|
Last Audit Page Number |
Enter a sequential page number that prints on audit reports detailing transactions entered to the ledgers. |
|
|
Enable T Accounts |
If you want to enable T accounts, select Yes. Otherwise select No. |
|
|
Default to Printing Cheques |
Select an option for cheque printing:
|
|
|
Use Templates |
Select Yes to activate this feature. Templates assist in creating uniformity across accounts. They are generally used when departments are used. |
|
|
Use Control Totals |
Select Yes if you wish to use the batch posting reconciliation tool. |
Micronet redisplays the Change Existing Company screen.
