
You use the PINPAD menu option on the Cash Register File Update screen to register a PINpad in POS.
To register a PC EFTPOS PINpad:
Refer to "Adding a New Cash Register" or "Updating a Cash Register".
Micronet displays the Edit Pin Pads screen.
If you selected to add or edit a PINpad, Micronet displays the Add/Edit Pin Pad screen.
|
|
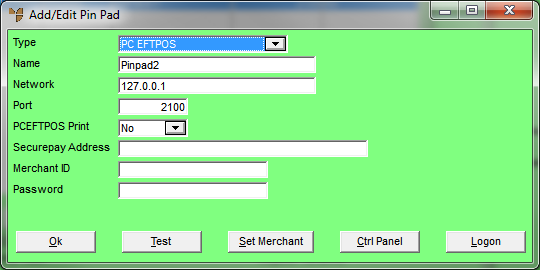
Field |
Value |
|
|
Type |
Select PC EFTPOS. |
|
|
Name |
Enter a unique name for the PINpad. |
|
|
Network |
Enter the static IP address of the workstation with the PINpad. Adjust any firewall settings to allow access. |
|
|
Port |
Enter the port number for the PINpad as entered in the Registry – see "Installing PC EFTPOS and PINpad (Wide Area Network)". |
|
|
PCEFTPOS Print |
Select Yes to print POS dockets on the printer defined in the PC EFTPOS setup, or No if you want the PC EFTPOS dockets added to the POS docket. If you select Yes, Micronet adds PC EFTPOS dockets into the POS docket (pos and dih) files as text, with the POSL_EFTPOS and DIL_EFTPOS flags set to 1 for Merchant Copy and 2 for Customer Copy. |
|
|
SecurePay Address |
This field only applies to Tyro EFTPOS. |
|
|
Merchant ID |
This field only applies to Tyro EFTPOS. |
|
|
Password |
This field only applies to Tyro EFTPOS. |
Micronet redisplays the Edit Pin Pads screen.
Micronet redisplays the Cash Register File Update screen.